DIY Guide: Hardcover Made Easy
In this guide we show you how easy it can be to bind your own hardcover book. With our detailed step-by-step instructions including a video we want to inspire more people to discover the world of bookbinding. This guide is the first major project of our new staff member Julia, who is not a trained bookbinder herself and thus learned a lot while creating this guide. To go with the guide, we also offer all the materials and tools as a set.

Table of contents:
1 Material and tools
- Cover material (Bookbinding cloth, cover paper)
- Bookbinders grey board for front and back cover as well as spine
- Book block blank (bound book block with attached endpaper)
- Headband
- Bookmark
- Sharp knife, e.g. cutter knife
- Scissors
- Pencil
- Brush
- Glue (we recommend using a universal bookbinding glue such as Planatol BB)
- Bonefolder
- Casemaking square (practical tool, is not absolutely necessary)
- Corner cutting tool (practical tool, is not absolutely necessary)
DIY set you can configure yourself
Our DIY set configurator contains all the necessary materials and tools (the tool set is optional) and allows you to design your own individual notebook at the same time. You can decide whether it should be a notebook with gilt edges, which cover material you want to use and which colours the headband and the bookmark should have. We will then send you your individually configured set in the quantities you need.
Go to diy set
Pre-bound book block with attached endpaper (with or without gilt edges)
Especially for bookbinding work (optional in the tool set)
3D printed tool from iBookBinding (optional in the tool set)
Choose from many colours and materials.
3D printed tool from iBookBinding (optional in the tool set)
Choose between different colours.
Choose between different colours.
Greyboard cut to the correct dimensions.
Essential for bookbinding work (optional in the tool set)
Universal bookbinding glue (optional in the tool set)
2 Video-Guide: Step by step to your hardcover book
We'll show you how to bind your own hardcover book with our DIY kit in our video guide. Easy to watch and follow along.
3 Guide: All steps explained in detail
You'd rather read than watch a video? No problem, we have described the process again in detail in our step-by-step guide.
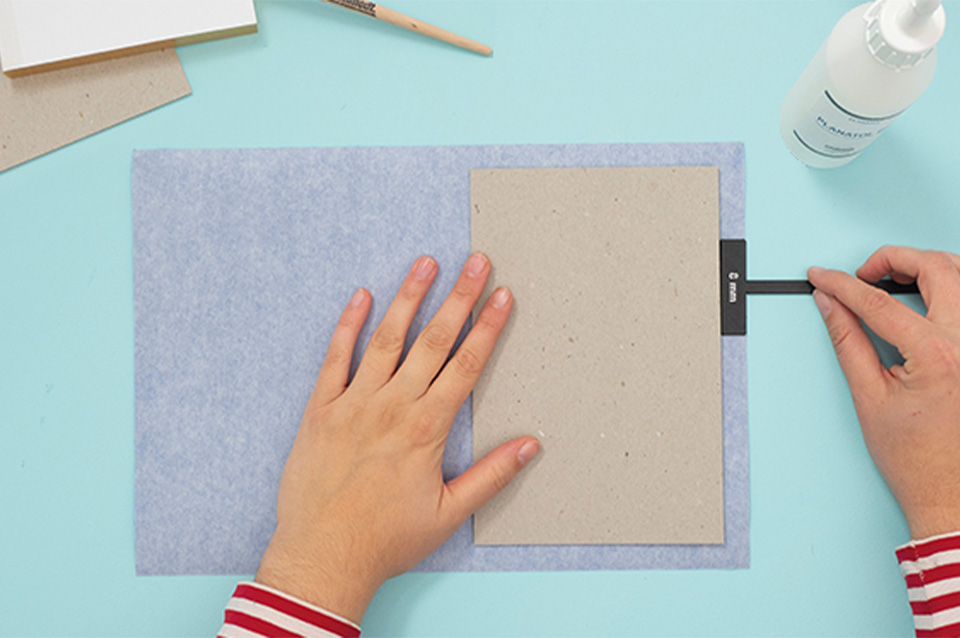
Step 1: Measure & mark board placement
Place the cloth blank in front of you with backside facing upwards. The width and height of the cover material is 8mm larger than the cardboard including the spine insert and the width of the joints (space between the cover boards and the spine insert). Place the boards on the cloth according to the illustration and mark the position of the boards on the cloth. With the Casemaking square you can make sure that you have the same distance on all sides and that everything is square.

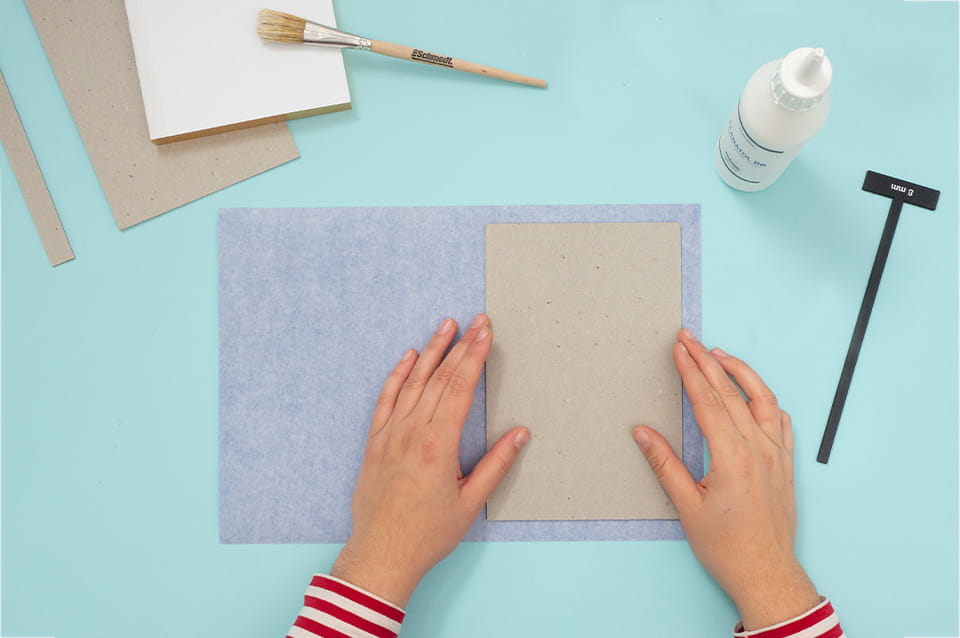
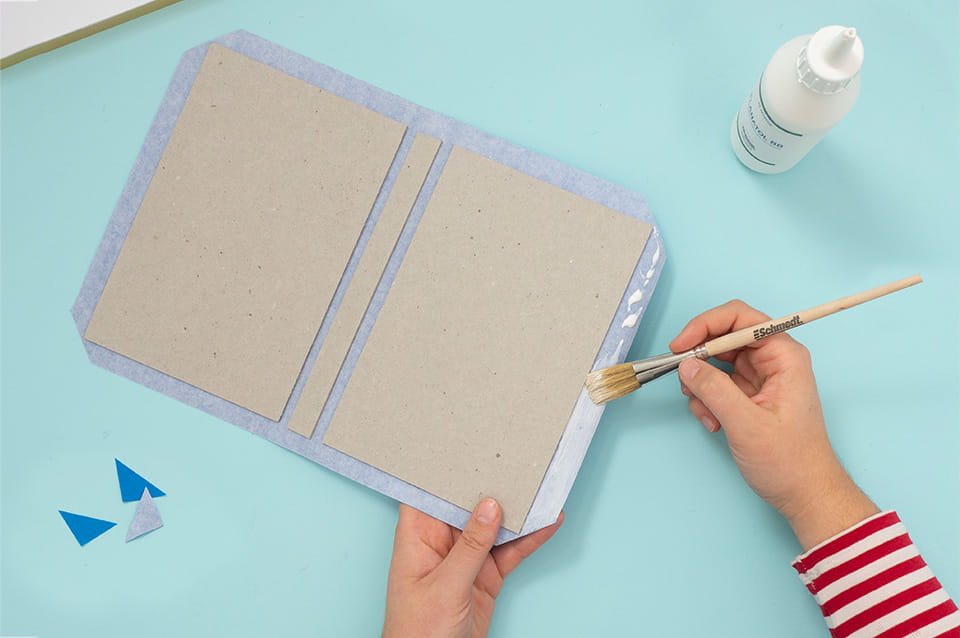
Step 2: Glue on the boards
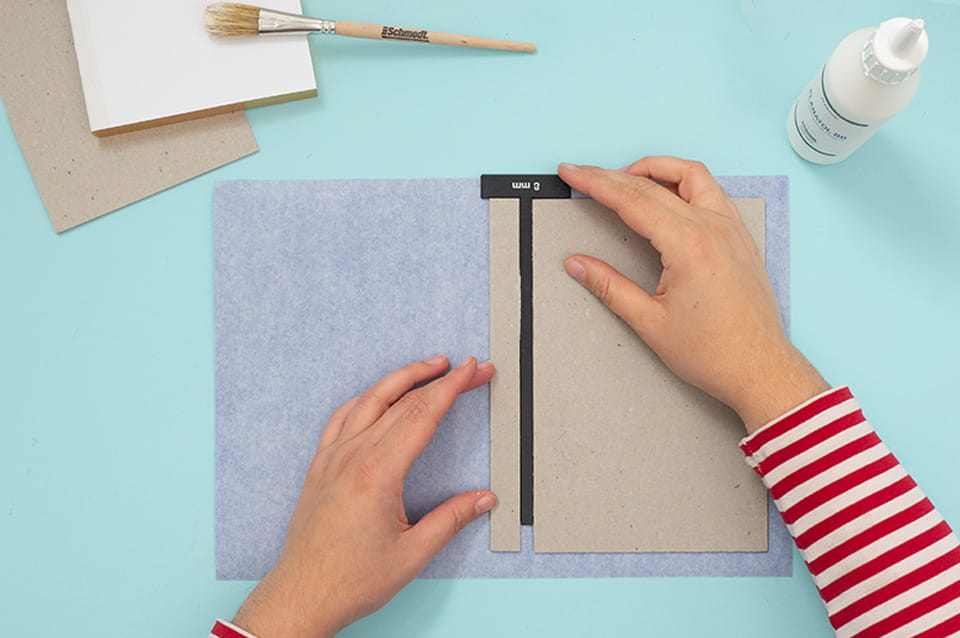
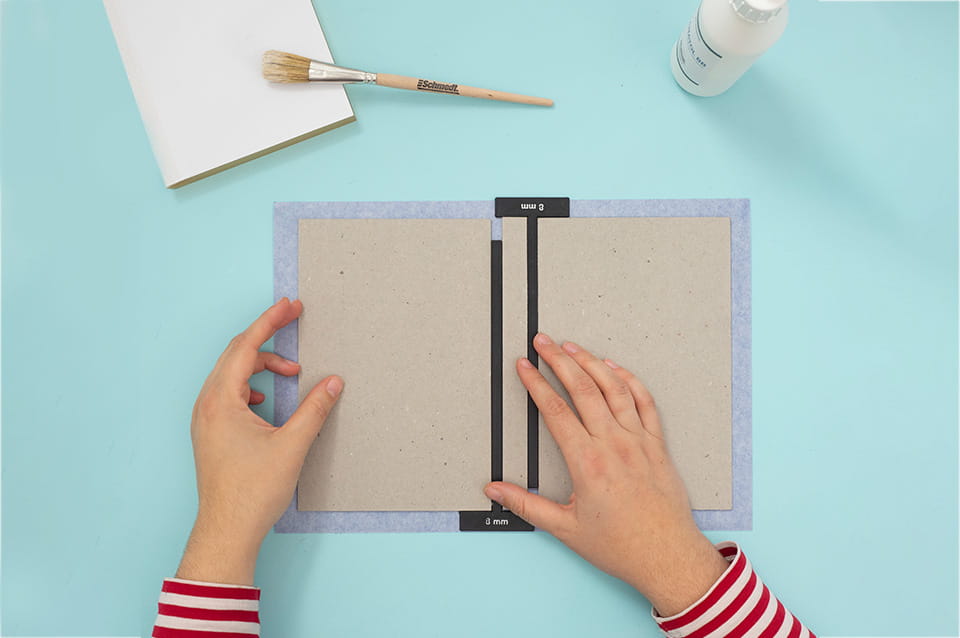
Apply glue to one board at a time and place the glued cardboard on the cloth according to your pencil measurements. When spreading the glue, make sure that the entire surface is covered with glue up to the edges. With the supplied glue you have some time for corrections, but you should work quickly, so that the glue does not become too dry. If it happens that the glue has become too dry, simply apply another layer of glue. When placing the boards, you can press them down with the clean palm of your hand.
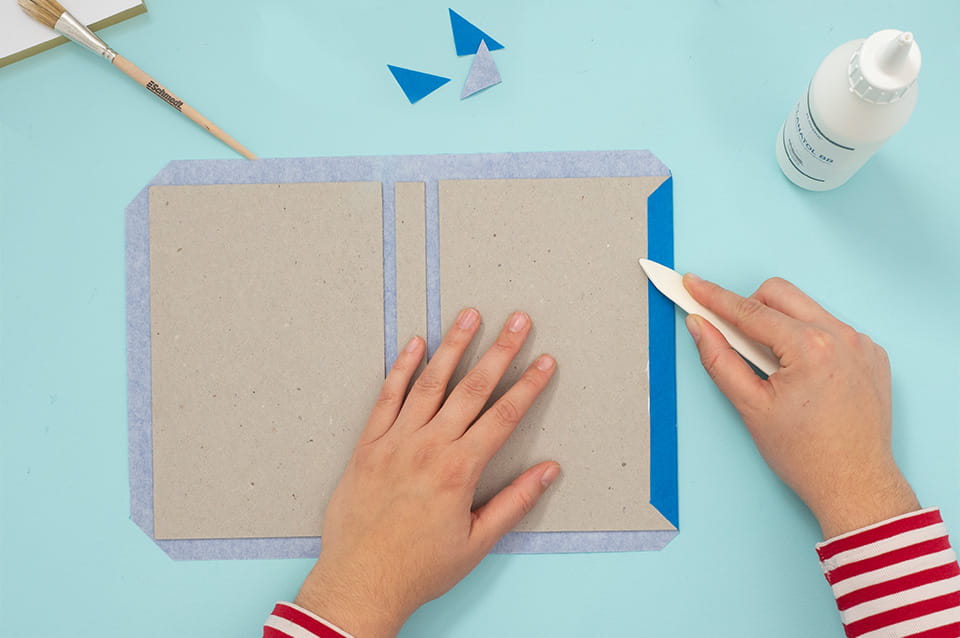
The Casemaking square is a great help when attaching the cardboards - make sure that the fold distances between the lid cardboards and the spine are the same. Use the Casemaking square to maintain the spacing between the lid board and the back board.
Once you have pressed all the boards firmly onto the cloth, carefully turn the cloth over and rub the cloth area against the board neatly with the bonefolder. There should be no air bubbles between the cloth and the cardboard.
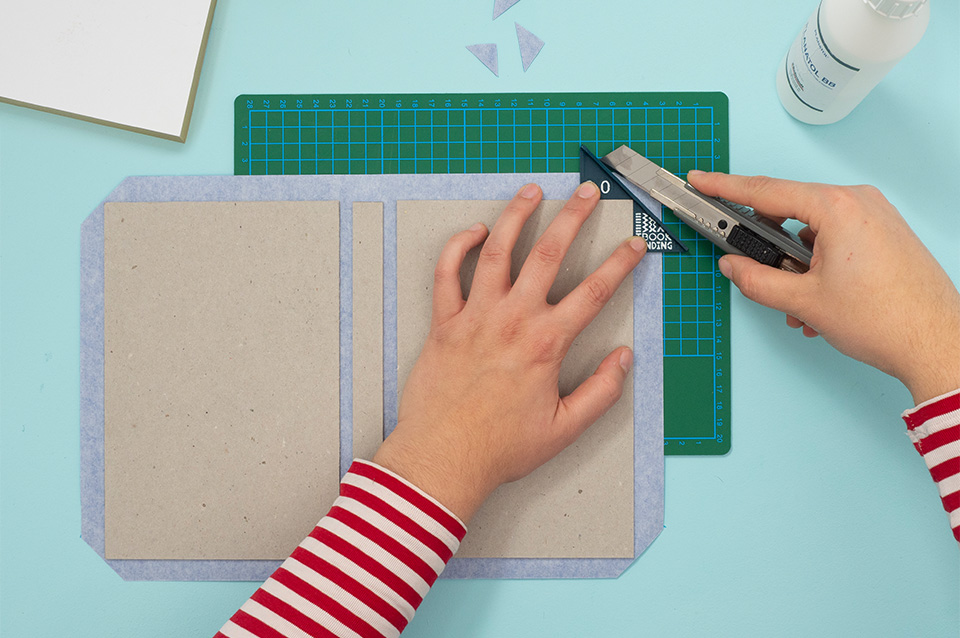
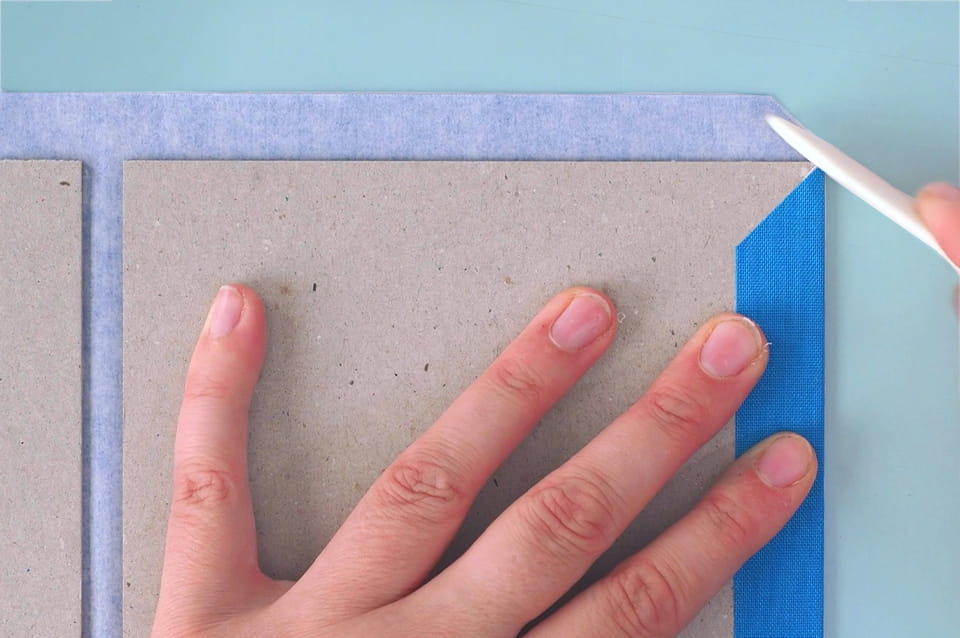
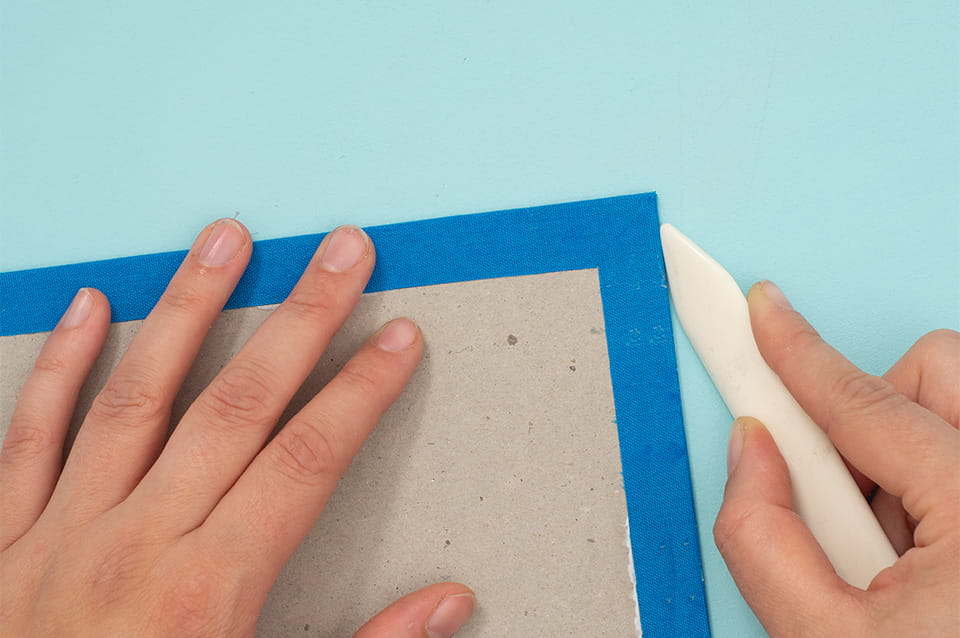
Step 3: Cut the corners
Are all the cardboards firmly attached to the cloth? Then you can now cut the corners of the cloth at a 45° angle. To do this, carefully turn the book cover blank over again and place the corner cutting device against the corners of the cardboards. Use a sharp cutter (or knife) to cut off all four corners of the cloth along the corner cutting device.
If you do not have a corner cutter at hand, make sure that the cut is not made directly against the cardboard, but at a distance of 2mm.
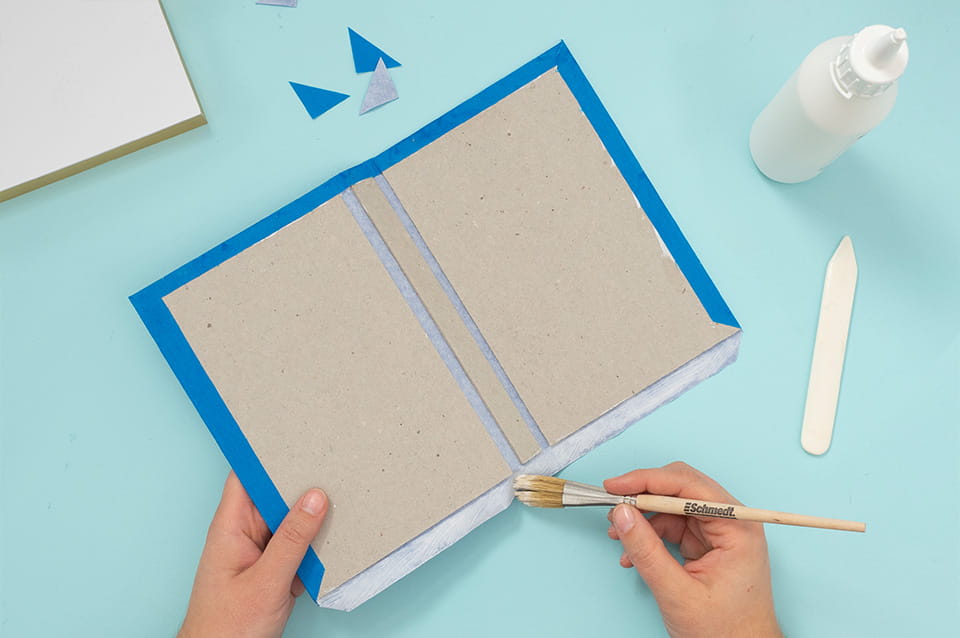
Step 4: Fold in the edges
The first step is to glue on the right and left edges of the fabric and then fold them in or over onto the cardboard. You can also start with the top and bottom if you would like - this is not critical. In order to form a snug edge, first rub the cloth against the side edge of the cardboard with the bonefolder and then bend the entire overhang over and rub it neatly against the cardboard with your bonefolder. Rubbing with the bonefolder prevents air bubbles and creases. Repeat this procedure with the opposite side.
Now you have to pinch (tuck in) the corners. To ensure that the edges of the book cover look well formed later, the protruding "pockets" on the edge must be pressed in and covered by cloth. To do this, place the cover on a clean surface and press down the small excess material at the corners with your finger or bonefolder.
Once the corners have been pressed in, the remaining two edges are folded in. Then you can check everything and, if necessary, rub the cloth again with the bonefolder to smooth it out.
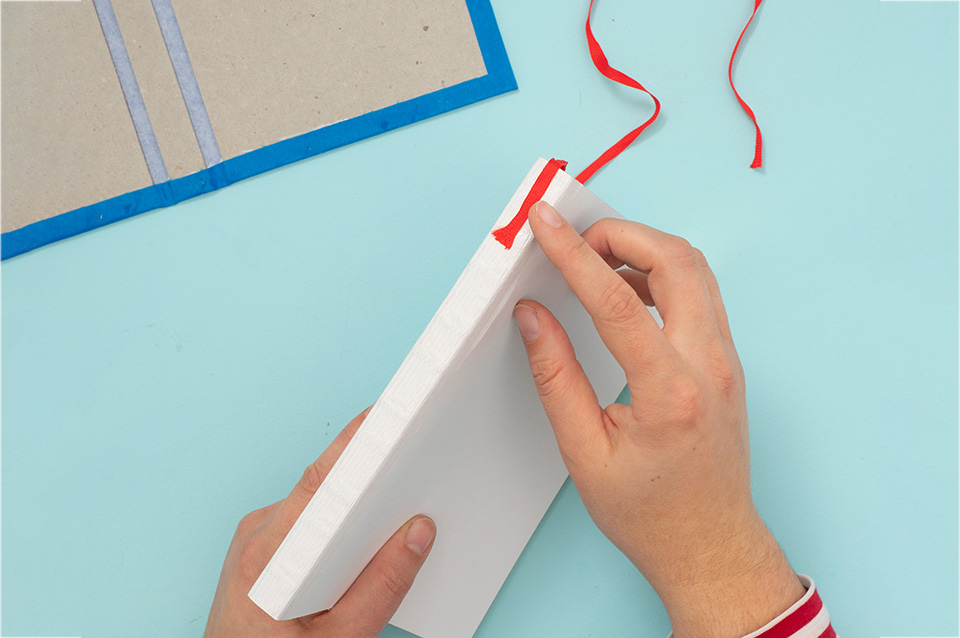
Step 5: Attach the bookmark
For the bookmark, coat about 5cm of the spine with glue and apply approx. 5cm of the bookmark to the spine. Then add another thin layer of glue on top.
You can now cut the bookmark to the desired length. And if you want, you can use a lighter to carefully and briefly heat the tail end of the bookmark so that the tip is neatly closed.
To keep the bookmark out of your way during the rest of the process, you can open the book block after step 6 (attaching the headband) and place the bookmark inside the book. Turn a few pages over and fold the end of the bookmark into the open page. This prevents creases in the bookmark and keeps it out of your way.
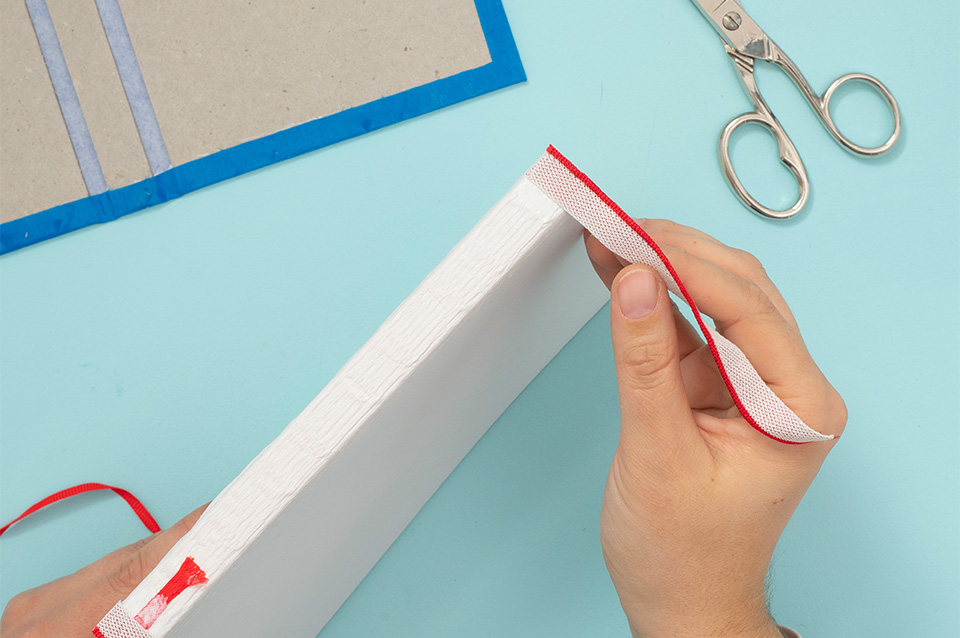
Step 6: Attach the headband
Now you can add the headband to complete your book block. Apply approx. 1 cm of glue to both the top and bottom end of the book spine. Alternatively, you can also apply glue to the lower part of the headband if you would like, but it is normally easier to apply glue to the block. You can either cut the headband to the book block thickness before attaching it, or shorten it afterwards on the book block. Now we glue the headband over the bookmark ribbon. The coloured part of the ribbon should extend just beyond the head or foot of the book when it is applied. Once you are happy with the positioning, if you did not before, now is the time to cut the headband to size. Continue with the other side (where there is no bookmark).
How long both bookmark and headband should be is a matter of taste in the DIY space, but we generally can recommend the following:
- 28cm + 5cm for the bookmark
- for the headband: book block thickness + 1-2mm
You can colour coordinate the capital ribbon and the bookmark ribbon: Uniform in one colour or you can work with e.g. complementary colours.
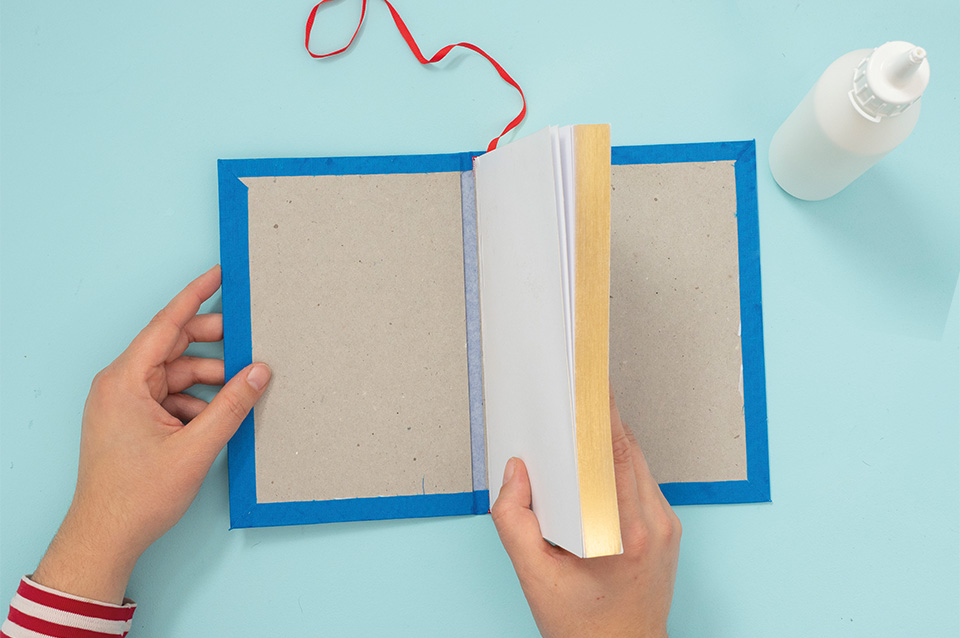
Step 7: Position book block into the case
The book block blank is now placed in the cover. Insert the book block into the hardcover so that it has the same distance from all 3 open sides and fits directly against the spine board. Afterwards, place the closed book in front of yourself.
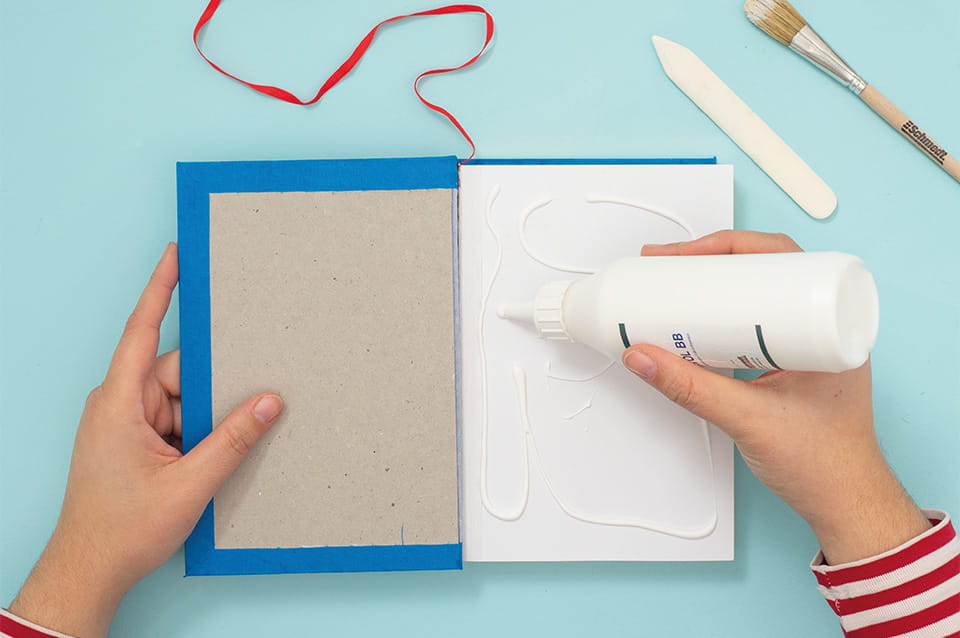
Step 8: Glue case and book block together (also called casing-in process)
Carefully open the book cover on one side without moving the book block. Now apply glue to the endpaper and spread the glue over the entire surface of the endpaper. You can place a larger piece of scrap paper under the first endpaper sheet of the book block so that you can freely spread glue. But this is not a must if you work carefully. Make sure that the entire endpaper sheet is covered with glue. If you used a scrap paper, carefully pull it out again. If the corners of the endpapers curl up, you can bend them back using your fingers. Make sure that you do not have any glue on your fingers before continuing.
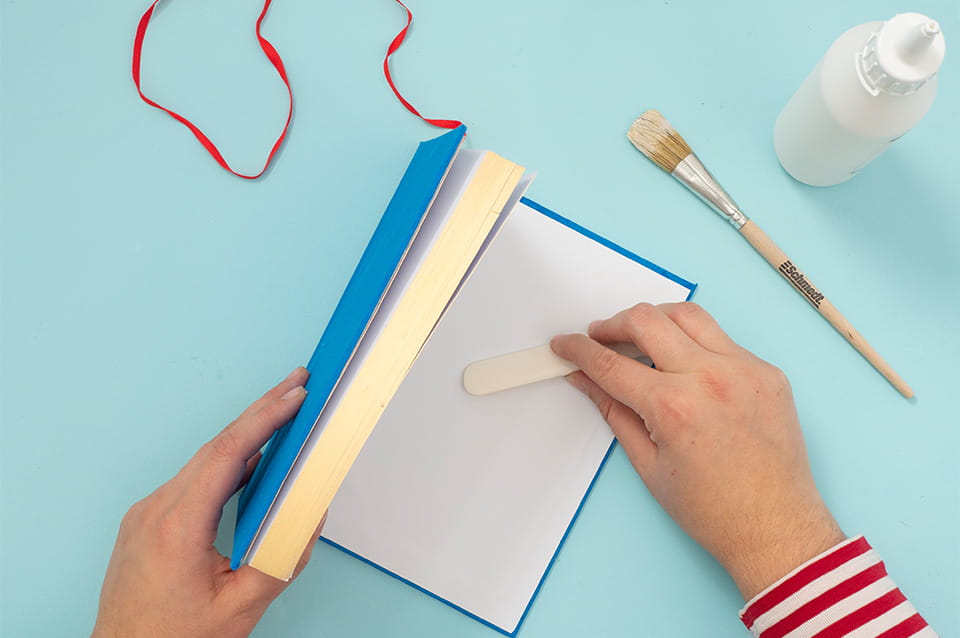
Again check the spacing of the book against the case. Is the spacing correct and does the book block lie directly against the spine? Then carefully close the book cover on the glue-covered endpaper. Turn around the whole construction and do the same for the other side. After both endpapers are glued on, you can open the book to the endpaper page and use your bonefolder to rub the endpaper against the cardboard of the book case and eliminate any bubbles or wrinkles.
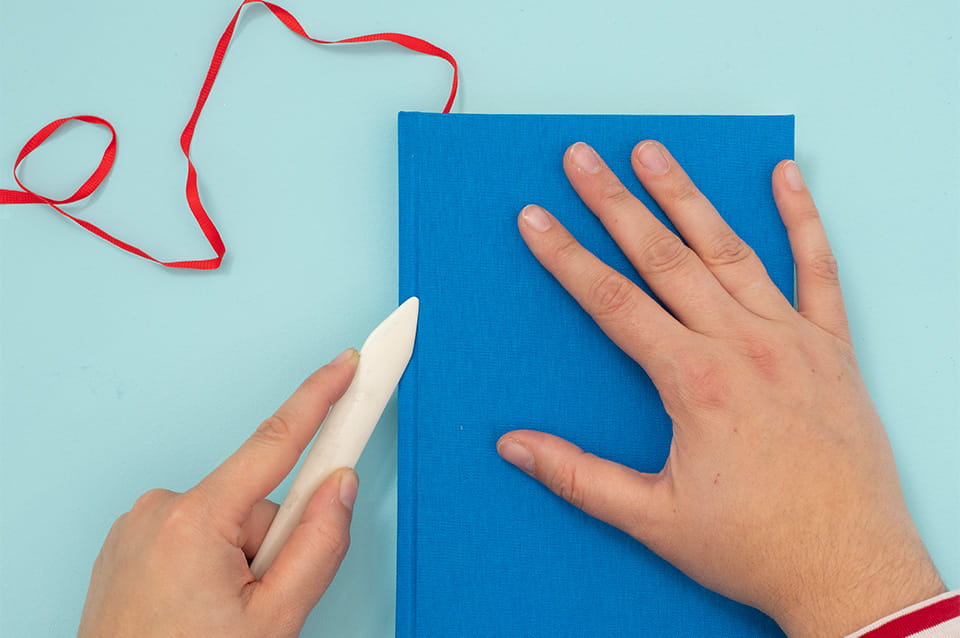
Once you have applied pressure to the endpaper and improved the adhesion, you can form the joint with your bonefolder. To do this, close the book and apply pressure to the spacing between the gap between the front/back board and the spine board. Shaping the joint gives the book a special aesthetic and supports the hinge effect.
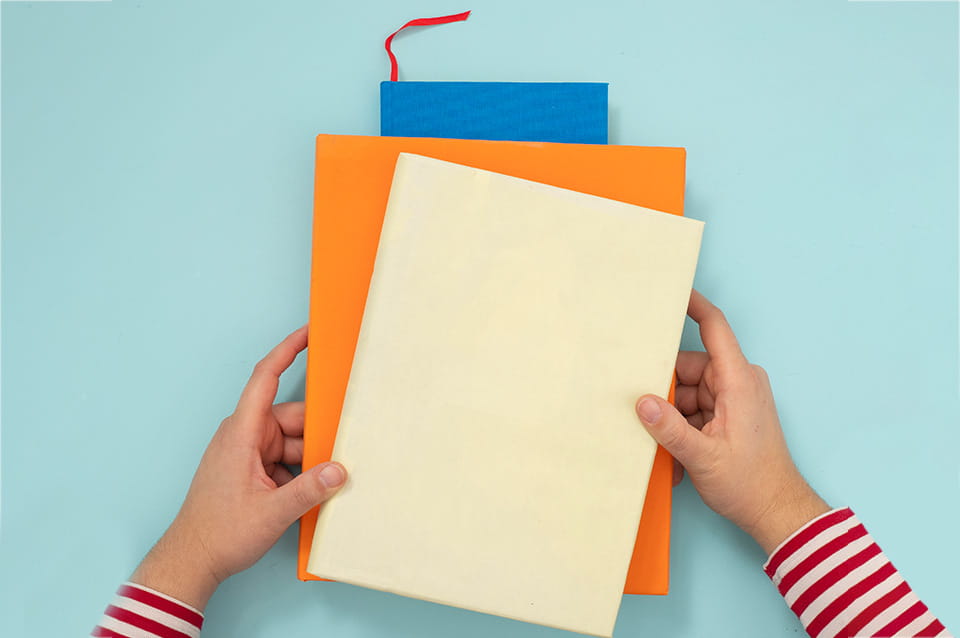
You should now press your book overnight by covering it with heavy books or other heavy objects. Have fun with your new notebook!
4 Even more creativity
Anyone who has ever used Washi Tape knows about the great haptics of this adhesive tape. It is particularly suitable for creative work around books and paper.


In stock, deliverable at short notice


In stock, deliverable at short notice


In stock, deliverable at short notice


In stock, deliverable at short notice


In stock, deliverable at short notice


In stock, deliverable at short notice


In stock, deliverable at short notice